Office 365 to Office 365 Migration Guide
Learn how to plan and execute a smooth Office 365 to Office 365 migration, moving mail, files, and Teams with minimal disruption. See the full guide now.
Want to make your Microsoft 365 work harder for your business?
and we’ll tailor a solution that’s just right for you.
Moving your digital workspace can feel risky, especially during mergers, acquisitions, or restructuring. Emails, files, Teams chats, and apps all need to move without causing problems.
Migrating from one Office 365 environment to another, also called tenant-to-tenant migration, is more than just copying files. Everything also needs to stay connected and work smoothly for your team. Even though Microsoft now calls it Microsoft 365, most people still refer to it as Office 365.
These migrations can involve huge amounts of data and hundreds or even thousands of users. Without careful planning, they can lead to downtime, broken workflows, or lost information. That’s why testing, mapping, and staged rollouts are so important.
This guide walks you through what a tenant-to-tenant migration involves. It covers key steps, planning tips, and proven strategies to make sure your move is smooth and secure.
Essential Highlights:
- Plan with Precision: Map your Office 365 tenant migration around business needs, including user mapping, license checks, and domain verification, to prevent downtime.
- Prepare Both Tenants Early: Configure source and target environments properly, assign roles, verify domains, disable sync, and back up data before migration day.
- Select the Right Migration Method: Weigh native Microsoft tools against third-party platforms based on automation, cost, and coverage across mail, files, and Teams.
- Execute in Structured Phases: Follow a clear process: pre-checks, mailbox and OneDrive moves, SharePoint transfers, DNS cutover, and post-migration validation.
When and Why Businesses Migrate Between Office 365 Tenants
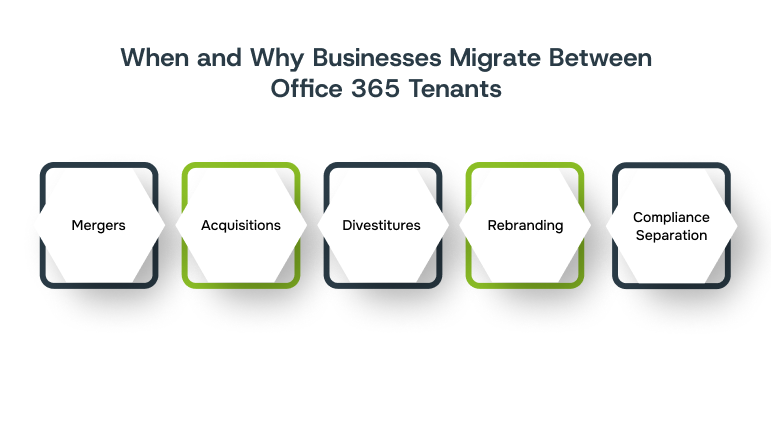
Tenant migrations typically occur when a company undergoes a significant change. Here’s what typically triggers a move and why it matters:
- Mergers: Two environments need to combine to avoid duplicate costs and fragmented communication.
- Acquisitions: The acquiring company folds a smaller tenant into its existing setup.
- Divestitures: A business unit spinning off needs full independence from the parent tenant.
- Rebranding: The old domain becomes obsolete and must be replaced.
- Compliance separation: Regulated industries like finance, healthcare, or government need to keep certain data strictly isolated.
During these moves, some technical issues can naturally arise: permissions may break, email links may stop working, and shared mailbox access can disappear due to changes in security tokens and domain references.

To avoid unnecessary disruption during these complex transitions, it’s crucial to prepare thoroughly before any migration begins.
Pre-Migration Steps to Ensure a Smooth Transition
Getting your inventory right before you start determines whether the migration goes smoothly or becomes a crisis. You need exact numbers, clear ownership, and realistic timelines. Here’s what to lock down:
- Count all active user accounts, including contractors, part-timers, and service accounts used by automated systems
- Measure total data volume:
- Use OneDrive reports for individual usage
- Review the SharePoint storage site by site
- Get Exchange mailbox sizes from the recipient report
- Document every shared mailbox: name, current members, and dependent departments
- List all Microsoft 365 groups, flagging active owners vs orphaned groups
- Check resource mailboxes (meeting rooms, equipment) for active usage
- Confirm access to your domain registrar to update DNS. If a third party manages DNS, collect contact details and ensure they’re available during the migration window
- Draft a communication plan:
- Announcement email
- Detailed instructions one week prior
- Timing update 24 hours before
- Establish a realistic maintenance window based on business tolerance for downtime
- Choose 10-15 users for a pilot migration, including executives, typical staff, and power users (50GB+ mailboxes)
Also Read: Optimise Your Microsoft 365 for Better Productivity
With the groundwork in place, the next step is to get both your source and target environments ready for the actual migration.
Preparing Source and Target Tenants
Both environments require specific configuration before any data can be moved. Missing a license assignment or skipping domain verification can create problems that completely break progress. Get these fundamentals right:
- Assign Exchange Administrator roles to the accounts running the migration. Global administrators have too much power and create security risks.
- Purchase enough Exchange Online licenses in the target tenant before anyone moves. Users landing without licenses can’t access their mailboxes.
- Add your domain to the target tenant through the admin centre and verify ownership with the TXT record Microsoft provides.
- Create a dedicated migration admin account with a randomly generated 20+ character password and enable MFA using an authenticator app.
- Turn off Azure AD Connect sync at the source if it’s running. The sync service interferes with mailbox moves.
- Build a mapping spreadsheet with source UPN in column A and target UPN in column B, plus columns for license type, manager relationship, department, and security group memberships.
- Export current permission sets from SharePoint site collections using PowerShell commands that dump all users, their roles, and permission levels into a CSV.
- Use a third-party backup tool to create a snapshot of everything before migration day. Microsoft’s built-in retention only covers deleted items for a limited window.
Once both tenants are properly configured and secured, it’s time to decide how the actual migration will take place.
Office 365 to Office 365 Migration Methods
Today, tenant-to-tenant migrations can be managed using several methods, each suited to different data types, complexity, and organisational resources. Native Microsoft tools offer free options with moderate automation but require technical expertise and have limitations around Teams data.
Third-party platforms provide faster, more automated, and broader coverage at a cost, though Teams chat migration remains a challenge across all solutions.
Below is a high-level comparison of common migration methods based on speed, cost, automation, and scope of data supported:
| Method | Speed | Cost | Automation Level | Scope (Mail, Files, Teams) |
| Manual PST Export | Slow | Free | None | Mailboxes, OneDrive, SharePoint only |
| Microsoft Native Tools | Moderate | Free | Partial to High | Mailboxes, OneDrive, SharePoint; limited Teams |
| Third-Party Solutions | Fast | Paid | High | Comprehensive across Mail, Files, Teams |
Note: Migrating Teams chat history and shared mailbox permissions often requires specialised tools or scripts, as native Microsoft methods have limitations.
Also Read: How to Integrate Microsoft Teams with Office 365
With a clear understanding of the migration options available, the next step is to walk through the actual process.
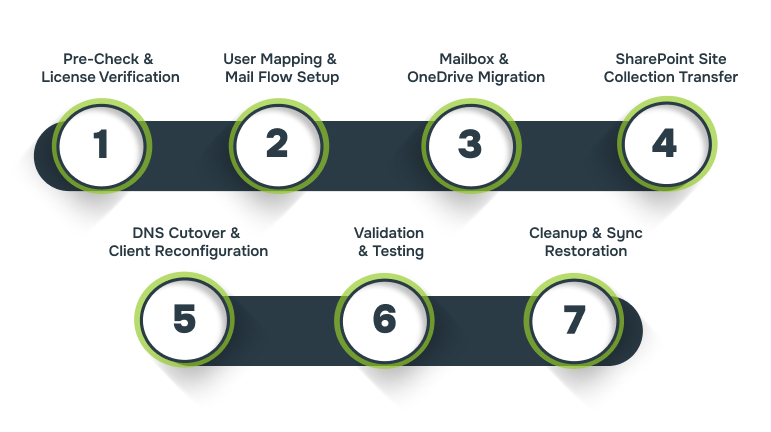
Step-by-Step Office 365 to Office 365 Migration Process
Large-scale migrations are often challenging. Over 90% of major migration projects miss their deadlines, and nearly half experience significant downtime. Even beyond Microsoft 365, these statistics highlight the importance of careful planning and phased execution.
Migrations follow a sequence where each phase builds on the previous one. Skipping steps or rushing through validation creates problems that can take days to untangle. Here’s the timeline:
1. Pre-Check And License Verification
Run license assignment reports in both tenants two weeks before your scheduled start. Discrepancies between what you thought you had and what’s actually allocated cause last-minute scrambling.
Reduce the MX record TTL from the typical 3600 seconds to 300 seconds so that DNS changes propagate faster when you switch mail routing to the new tenant.
Note: Pausing inbound mail flow isn’t always done manually. Some organisations rely on reducing the MX record TTL and timing the cutover accordingly to minimise mail delivery issues. It’s worth clarifying your approach early to avoid unexpected mail delays or duplicates.
2. User Mapping And Mail Flow Setup
Build user principal name matches in your spreadsheet. Source users often have different email formats than target naming conventions. Some organisations use firstname.lastname while others use firstinitiallastname.
Configure mail flow connectors if you need to route email between tenants during a phased migration. This lets users in different tenants still email each other while departments move across several weekends.
Also Read: How to Configure Office 365 Single Sign-On Integration
3. Mailbox And OneDrive Migration
It’s best to start your mailbox migration during off-hours when email traffic is lower. Large mailboxes with years of archived data can take a long time to sync. Here’s how to handle the main steps efficiently:
- Monitor sync progress through the migration tool’s dashboard.
- Transfer OneDrive content using the tool’s file sync module.
- Batch users into groups of 50 to avoid overloading the system, since individual libraries rarely exceed 100GB unless they store video files.
4. SharePoint Site Collection Transfer
Move SharePoint site collections based on business priority. Start with customer-facing sites since they get the most traffic. Internal HR sites can come later. The size of document libraries is less important than how complex the structure is or what custom permissions are in place.

5. DNS Cutover And Client Reconfiguration
Once mailbox syncing is finished and you’re ready to cut over, update the MX records. Change the MX priority so mail routes to the new tenant.
Keep the old MX records for a while as a fallback. Then update the Autodiscover CNAME records so Outlook points to the new tenant. Without this change, Outlook will keep connecting to the old mailboxes even after the MX updates.
6. Validation And Testing
After migration, it’s important to make sure everything works as expected. Here are some checks you should perform:
- Send a test email from an external account to a migrated user and verify it arrives at the new mailbox within two minutes.
- Open Teams on a migrated user’s account and confirm all channels appear with messages intact.
- Access a migrated SharePoint site and test editing a document.
- Check that version history survived the move and verify co-authoring still works by having two users edit simultaneously.
7. Cleanup And Sync Restoration
Completely remove the old domain from the source tenant because Microsoft won’t allow it to be registered in two places. If you’re connecting to an on-premises Active Directory, re-enable directory sync in the target tenant.
The sync service should then detect users already in the cloud and match them to local accounts using their email address or ImmutableID.
Also Read: Office 365 Services for Business: Overview and Usage
With a clear roadmap for the migration process in place, Alberon is ready to support your team through every phase, ensuring a seamless and controlled transition.
Office 365 Migrations with Alberon Guidance
Even with careful planning, migrations can reveal hidden dependencies between mail, Teams, and SharePoint. You need to ensure that everything runs smoothly and nothing is lost. At Alberon, we work alongside your team to manage these complexities and maintain control throughout the process.
Here’s how we help:
- Understanding how your systems work together: We review your mailboxes, shared files, and Teams setup to ensure a seamless migration.
- Keeping other software connected: We make sure your CRM, ERP, and other internal tools continue to operate without interruption.
- Dedicated oversight: Every migration is led by a project manager who tracks progress, communicates updates, and resolves issues promptly.
- Safe testing and monitoring: We test changes in controlled environments before going live, so you can avoid unexpected problems.
- Support after migration: Following the move, we assist with post-migration adjustments, ensuring that workflows and access are restored and fully operational.
After working with us, you’ll see that a migration isn’t just about moving mailboxes or files. It’s about keeping your systems connected, making sure your team can continue working without interruptions, and safeguarding critical data.
When these steps are handled carefully, you can move confidently from one tenant to another, knowing everything is in place.
Conclusion
A successful Office 365 migration comes down to clarity, preparation, and careful sequencing. When every step is planned and checked in advance, you maintain control and reduce the chance of surprises. Following a structured approach lets your team move confidently and focus on their work in the new environment.
For organisations that want guidance on planning and execution, Alberon is available to provide expert support. You can work with us to map out the migration strategy and ensure a smooth, predictable transition.
Contact Alberon today to map out a smooth Office 365 migration for your team!
FAQs
Q: How can I ensure minimal downtime during the migration?
A: Schedule the migration during off-peak hours and reduce the MX record TTL before the cutover. This speeds up DNS propagation and reduces email delays. Use coexistence setups to keep mail flowing between tenants during the transition.
Q: What should I do if users experience login issues post-migration?
A: Reconfigure affected devices to the new tenant, which may include rejoining Azure AD, updating Outlook profiles, and signing into Teams with the new credentials. Verify licenses are correctly assigned and check for any account conflicts.
Q: Are there any limitations when migrating OneDrive data?
A: Each OneDrive account must not exceed 2 TB of storage or 1 million items. Exceeding these limits can cause migration failures. Assess and clean up data before migrating to comply with these limits.
Q: How can I handle shared mailboxes during the migration?
A: Shared mailboxes migrate with user mailboxes, but only store permissions are retained. Post-migration, reapply access permissions and confirm that members have the correct rights. Test mailbox access to ensure permissions work correctly.
Q: What happens to Teams channels and files during migration?
A: Teams channels and associated files may not fully transfer with native tools. Use specialised migration tools or scripts to move channels, conversations, and files while maintaining permissions and structure.
Ready to Improve your Business Productivity
Get a trusted partner to navigate your digital transformation. With Alberon, you can ensure a smooth transition, clear communication, and peace of mind.